
Multi-account GitHub Workflow on Mac and Windows
If you have multiple github.com accounts, such as a personal and work account, and you want the correct account to be used automatically without signing out and signing in, then this post should interest you.
This is a spiritual successor to an old Medium post of mine that was specific to Mac.
This update was made possible by improvements to Git and GitHub that have been made over the years
- GitHub’s website now supports an account switcher
- Conditional includes using
includeIf - URL rewriting using
insteadOf
I added Windows support in this post as well.
For better or worse, SSH is still the best way to support multiple accounts automatically. Essentially the setup is like this:
- You’ll have a “default” account that uses https
- All other, “non-default” accounts will use ssh
However, unlike in the past, all use cases should now be covered properly with the aforementioned improvements. In the past, it was possible for some apps on your machine to break the workflow in my old post by invoking Git as a child process without properly injecting system environment variables. Now that Git itself can be configured to always use the correct credentials, this is no longer an issue.
There’s a lot of ground to cover, so let’s get into it.
Multi-account on github.com
The first thing you’ll want to do is sign into all of your accounts on github.com
- First sign in with any one of your accounts
- Then click your avatar in the top right
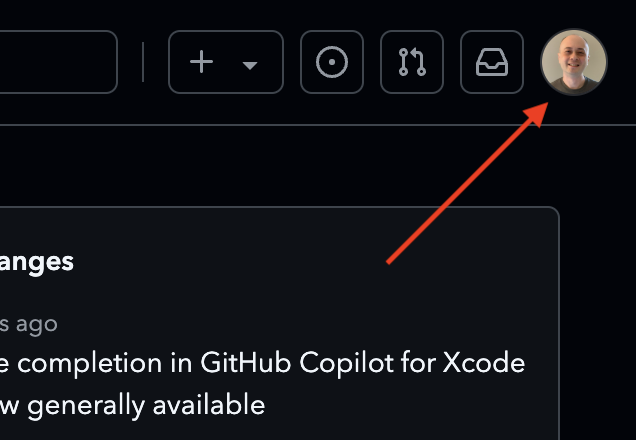
- Click the Account Switcher button (looks like left-right arrows)
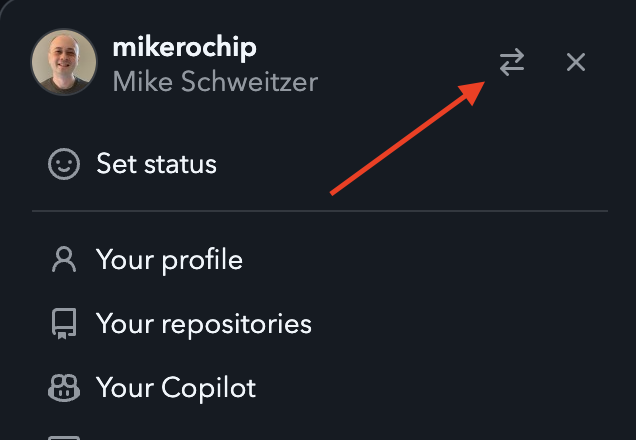
- Click the Add Account button
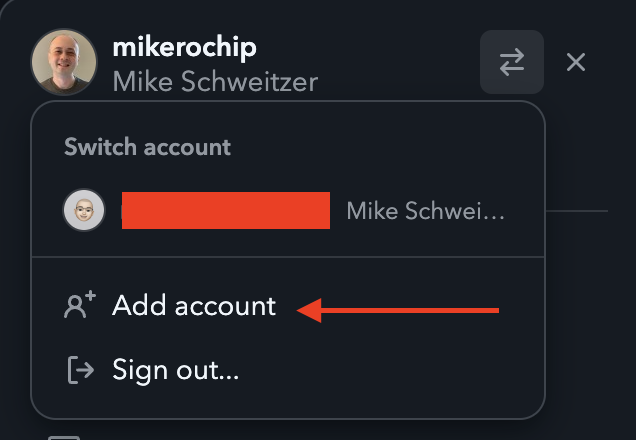
You’ll need to use the account switcher later to repeat chunks of this guide for each “secondary” account you want to setup.
OS and Software Versions
This guide was written using the following versions:
- Mac: macOS Sequoia 15.3
- Windows: Windows 11 24H2
- Git: 2.48.1
One-Time Machine Setup
⚠️ These steps only need to be done once per machine ⚠️
Currently, ssh keys are the only way to make auto-multi-account work. So most of this guide walks you through setting up ssh keys.
This is the general shape of what we will do:
- Organize your folders on disk similarly to how github.com organizes accounts i.e.
https://github.com/{account-name | org-name}/repo-name - Create ssh key pairs for any “non-default” accounts you want to use (your default account will use https)
- Use your ssh keys + folder layout + the
includeIfconfig option to automatically choose the correct account based on a repo’s folder
An ssh key is essentially a user/pass in the form of an encrypted file. Git has no built-in way to select accounts, but it does have ssh support. So we’re going to take advantage of that by leveraging ssh as an automated account selector.
Your User Folder
I’m going to refer to “your user folder” a lot in this guide. Your user folder is where many tools store settings, usually in a folder prefixed with the tool name (e.g. ~/.ssh is where the ssh tool stores settings). In Git’s case, Git stores settings files here directly like .gitconfig rather than in a subfolder.
On Mac and Windows that means these folders:
- Mac:
/Users/<YourUserName> - Windows:
C:\Users\<YourUserName>
From a Mac terminal or Windows PowerShell, the ~ character is an alias for your user folder:
cd ~
For example:
mike@mikes-mbp14 Developer % cd ~
mike@mikes-mbp14 ~ % pwd
/Users/mike
mike@mikes-mbp14 ~ %
Git Command Line Interface (CLI) Setup
Install Git
Let’s first walk through installing the Git CLI to support multiple accounts.
Mac
Since I work in games, I also install Git LFS. Even if you don’t plan to use LFS, installing it couldn’t hurt since it will make LFS-enabled repos behave correctly.
- Open a terminal
brew install gitbrew install --cask git-credential-managerbrew install git-lfs
You’ll configure Git in the next section (below the Windows setup).
Windows
- Download the 64-bit Git installer https://git-scm.com/downloads/win
- Run the installer
- There are a lot of pages in this installer, so for the most part, you’ll want to leave defaults as-is and choose the things that are called out here:
- Select Components
- Check
Windows Explorer Integration- Check
Git Bash - Check
Open Git GUI Here
- Check
- Check
Git LFS - Check
Associate .git* configuration files with the default text editor - Check
Associate .sh files to be run with Bash - Check
Add a Git Bash Profile to Windows Terminal - Check
Scalar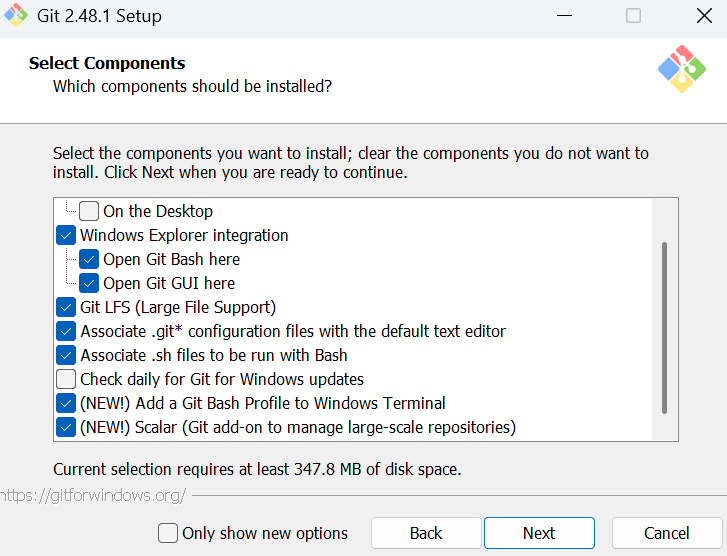
- Check
- Adjusting your PATH Environment
- Check
Git from the command-line and also from 3rd-party software
- Check
- Choosing the SSH Executable
- Check
Use bundled OpenSSH
- Check
- Choosing the HTTPS transport backend
- Check
Use the OpenSSL library
- Check
- Configuring the terminal emulator to use with Git Bash
- Check
Use Windows' default console window
- Check
You’ll do remaining Git config from a terminal in the next section.
Configure Git
We installed Git, now we need to configure it. Here, we setup global default Git config settings.
These steps are the same for Mac and Windows.
- Open a terminal
- Run these one at a time
git lfs installgit config --global user.name "YourFirstName YourLastName"git config --global user.email "youremail@example.com"git config --global init.defaultBranch maingit config --global pull.rebase truegit config --global push.autoSetupRemote truegit config --global core.editor nanogit config --global core.fsmonitor truegit config --global submodule.recurse true
All of these settings end up in your ~/.gitconfig file (in your user folder). It should look like this.
Mac
[filter "lfs"]
	clean = git-lfs clean -- %f
	smudge = git-lfs smudge -- %f
	process = git-lfs filter-process
	required = true
[user]
	name = Mike Schweitzer
	email = mschweitzer@gmail.com
[init]
	defaultBranch = main
[pull]
	rebase = true
[push]
	autoSetupRemote = true
[core]
	editor = nano
[credential]
	helper =
	helper = /usr/local/bin/git-credential-manager
[credential "https://dev.azure.com"]
	useHttpPath = true
Windows
[filter "lfs"]
	clean = git-lfs clean -- %f
	smudge = git-lfs smudge -- %f
	process = git-lfs filter-process
	required = true
[user]
	name = Mike Schweitzer
	email = mschweitzer@gmail.com
[init]
	defaultBranch = main
[pull]
	rebase = true
[push]
	autoSetupRemote = true
[core]
	editor = nano
.ssh Folder Setup
By convention, the ~/.ssh folder is where you store ssh keys.
Mac
- First, make sure you can see all hidden files and folders
- Open a terminal and run these in order
defaults write com.apple.Finder AppleShowAllFiles truekillall Finder
- Go to your user folder
- Create a folder called
.sshif not already there - Create a file called
configif not already there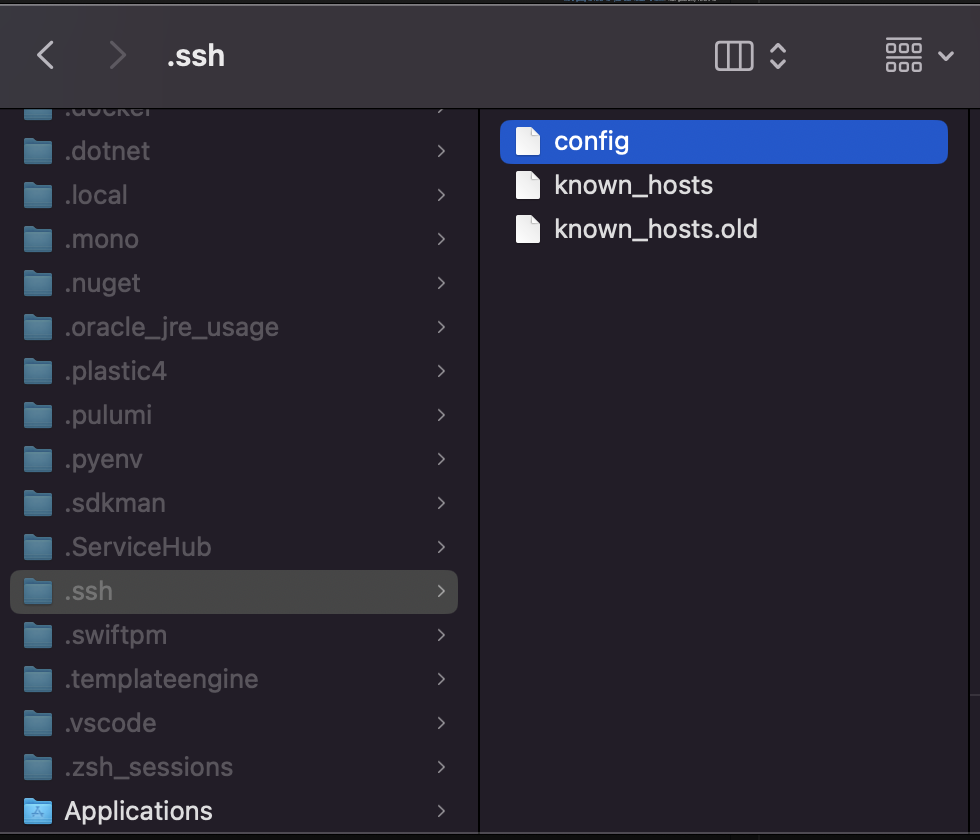
- The contents of
~/.ssh/configshould be
Refer to my original post if you want to know more about these properties.Host * UseKeychain yes AddKeysToAgent yes IdentitiesOnly yes
Windows
- First, make sure you can see all hidden files and folders
- Open File Explorer Options
- Check
Show Hidden Files - Uncheck
Hide extensions for known file types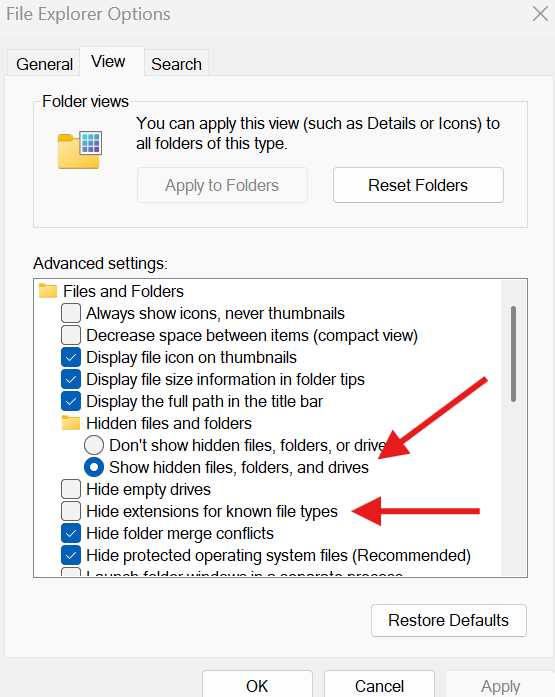
- Go to your user folder
- Create a folder called
.sshif not already there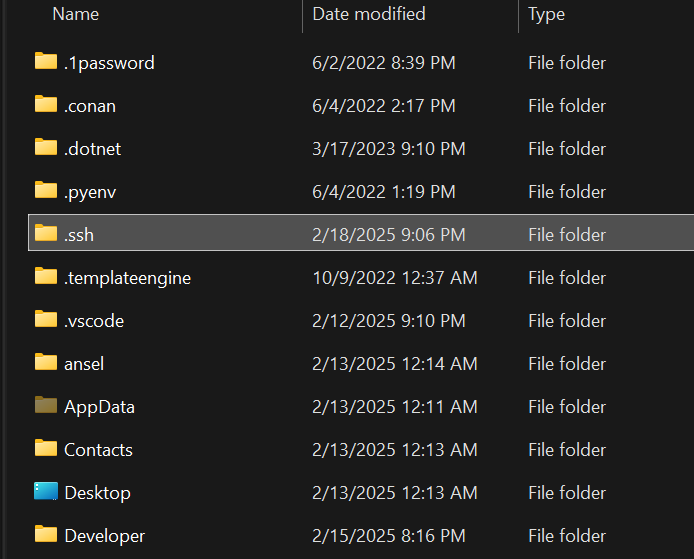
Repo Folder Setup
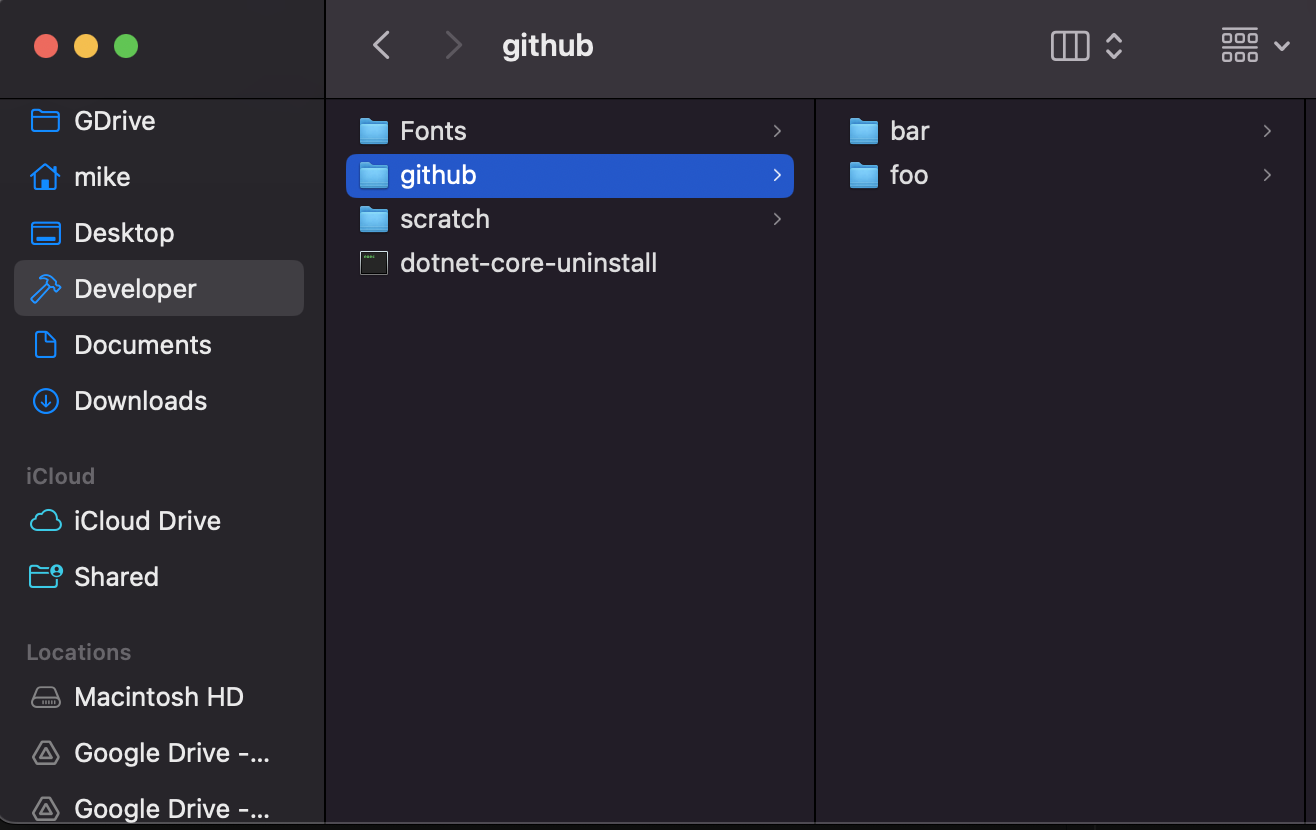
- Create a folder called
Developerin your user folder - Create a folder called
githubin yourDeveloperfolder - Create folders for each of your account or organization names, reminder that you want your folders to look like your github URLs
For example, if you have accounts foo and bar, you’d have something like this
Repeated Per-Account Setup
📣 These steps need to be repeated for each of your “non-default”, SSH accounts 📣
Let’s say we are working with this two account setup:
- Personal account
foolio- Personal email:
foo@example.com
- Personal email:
- Work account
foo-bar- Work organization:
bar - Work email:
foo-bar@bar.com
- Work organization:
You will need to run all of the steps in the following sections for both accounts.
For simplicity, I will use foolio and foo@example.com in the following steps.
Note for Organizations / Work Accounts
When setting up an org / work account, there is a trick:
- Anywhere in the following steps when you see the account name
foolio-> replace with org namebar(i.e. NOT the work account namefoo-bar) - Anywhere you see the email
foo@example.com-> replace with work emailfoo-bar@bar.com
In other words, when you setup a work account: replace the personal account name with the org name rather than your work account name and the personal email with your work email.
Create an SSH Key Pair
When creating an ssh key, you create a “key pair”, meaning two files: (1) a private key file and (2) a public key file.
The private key stays on your machine and the public key gets uploaded to your github.com account.
🚨 We will be giving our ssh key pair readable names that incorporate the word “github” followed by the account/org name. One of the most common points of confusion I see in ssh setup guides is leaving the default ssh key file names, which is typically the name of the encryption algorithm used to make the key. That’s not useful to you as an end user, so we’re going to avoid that problem. 🚨
NOTE: You will be given the option to password-protect your ssh keys. This is like password-protecting a pdf. I don’t do that and don’t recommend it, but it’s up to you.
Mac
Open a new terminal, and just copy what you see on the right hand side of each prompt of this terminal block into your own terminal.
mike@mikes-mbp14 ~ %
mike@mikes-mbp14 ~ % cd ~/.ssh
mike@mikes-mbp14 .ssh % ssh-keygen -t ed25519 -C "foo@example.com"
Generating public/private ed25519 key pair.
Enter file in which to save the key (/Users/mike/.ssh/id_ed25519): github_foolio
Enter passphrase (empty for no passphrase):
Enter same passphrase again:
Your identification has been saved in github_foolio
Your public key has been saved in github_foolio.pub
The key fingerprint is:
SHA256:2YGzaeGnJnHvt11w9610IEEsBsMy1Cxmti09u/HbKm8 foo@example.com
The key's randomart image is:
+--[ED25519 256]--+
|     ..+o. ..    |
|      B +oo..    |
|     + B+....    |
|      o.+B . .   |
|      ..Soo . o o|
|       +o+   . ++|
|      . o+.   . =|
|       oo.E..o + |
|         +=+o.o  |
+----[SHA256]-----+
mike@mikes-mbp14 .ssh % ssh-add github_foolio
Identity added: github_foolio (foo@example.com)
mike@mikes-mbp14 .ssh %
Windows
⚠️ You MUST use a Git Bash terminal in this step ⚠️. In all other steps, you can use the default PowerShell terminal.
Open a Git Bash terminal and copy what you see at each prompt.
Mike@zephyrus-m16 MINGW64 ~
$ cd ~/.ssh

Mike@zephyrus-m16 MINGW64 ~/.ssh
$ ssh-keygen -t ed25519 -C "foo@example.com"
Generating public/private ed25519 key pair.
Enter file in which to save the key (/c/Users/Mike/.ssh/id_ed25519): github_foolio
Enter passphrase for "github_foolio" (empty for no passphrase):
Enter same passphrase again:
Your identification has been saved in github_foolio
Your public key has been saved in github_foolio.pub
The key fingerprint is:
SHA256:BW6bt56HIt2X8f3tzUPd/TGib14MSCtBnLss2HCYjs4 foo@example.com
The key's randomart image is:
+--[ED25519 256]--+
|        o..      |
|       ..+       |
|      o o.o.     |
|     + o =o o    |
|    o = S.oo .  +|
|   . o o +....o++|
|  o    ......+o++|
|   E  . o.oo+.oo=|
|       . .oo+o .O|
+----[SHA256]-----+
Key Pair Files
After the above steps, you should have two files:
- Private key:
~/.ssh/github_foolio(stays on your machine) - Public key:
~/.ssh/github_foolio.pub(will upload contents to github.com in next section)
Restart your machine now.
This is the simplest, most reliable way I’ve found to get an SSH private key to be recognized on either Mac or Windows after much experimentation.
Copy the Public SSH Key to github.com
- First, find your machine name
- Mac: System Settings > General > Name
- Windows: Settings > System > About > Device name
- NOTE: You’ll need this to give your public ssh key a sensible name in your github.com account
- Login to github.com with your
foolioaccount- If you’re logging in to an account you made for work in order to access repos in a work org (e.g. your work account is named
foo-bar@bar.comor something), go ahead and login to that. We won’t need the name of your work github account elsewhere in this guide. - If your
foolioaccount is not currently selected, use the account switcher
- If you’re logging in to an account you made for work in order to access repos in a work org (e.g. your work account is named
- Click
Settings - Click
SSH and GPG Keys - Click
New SSH Key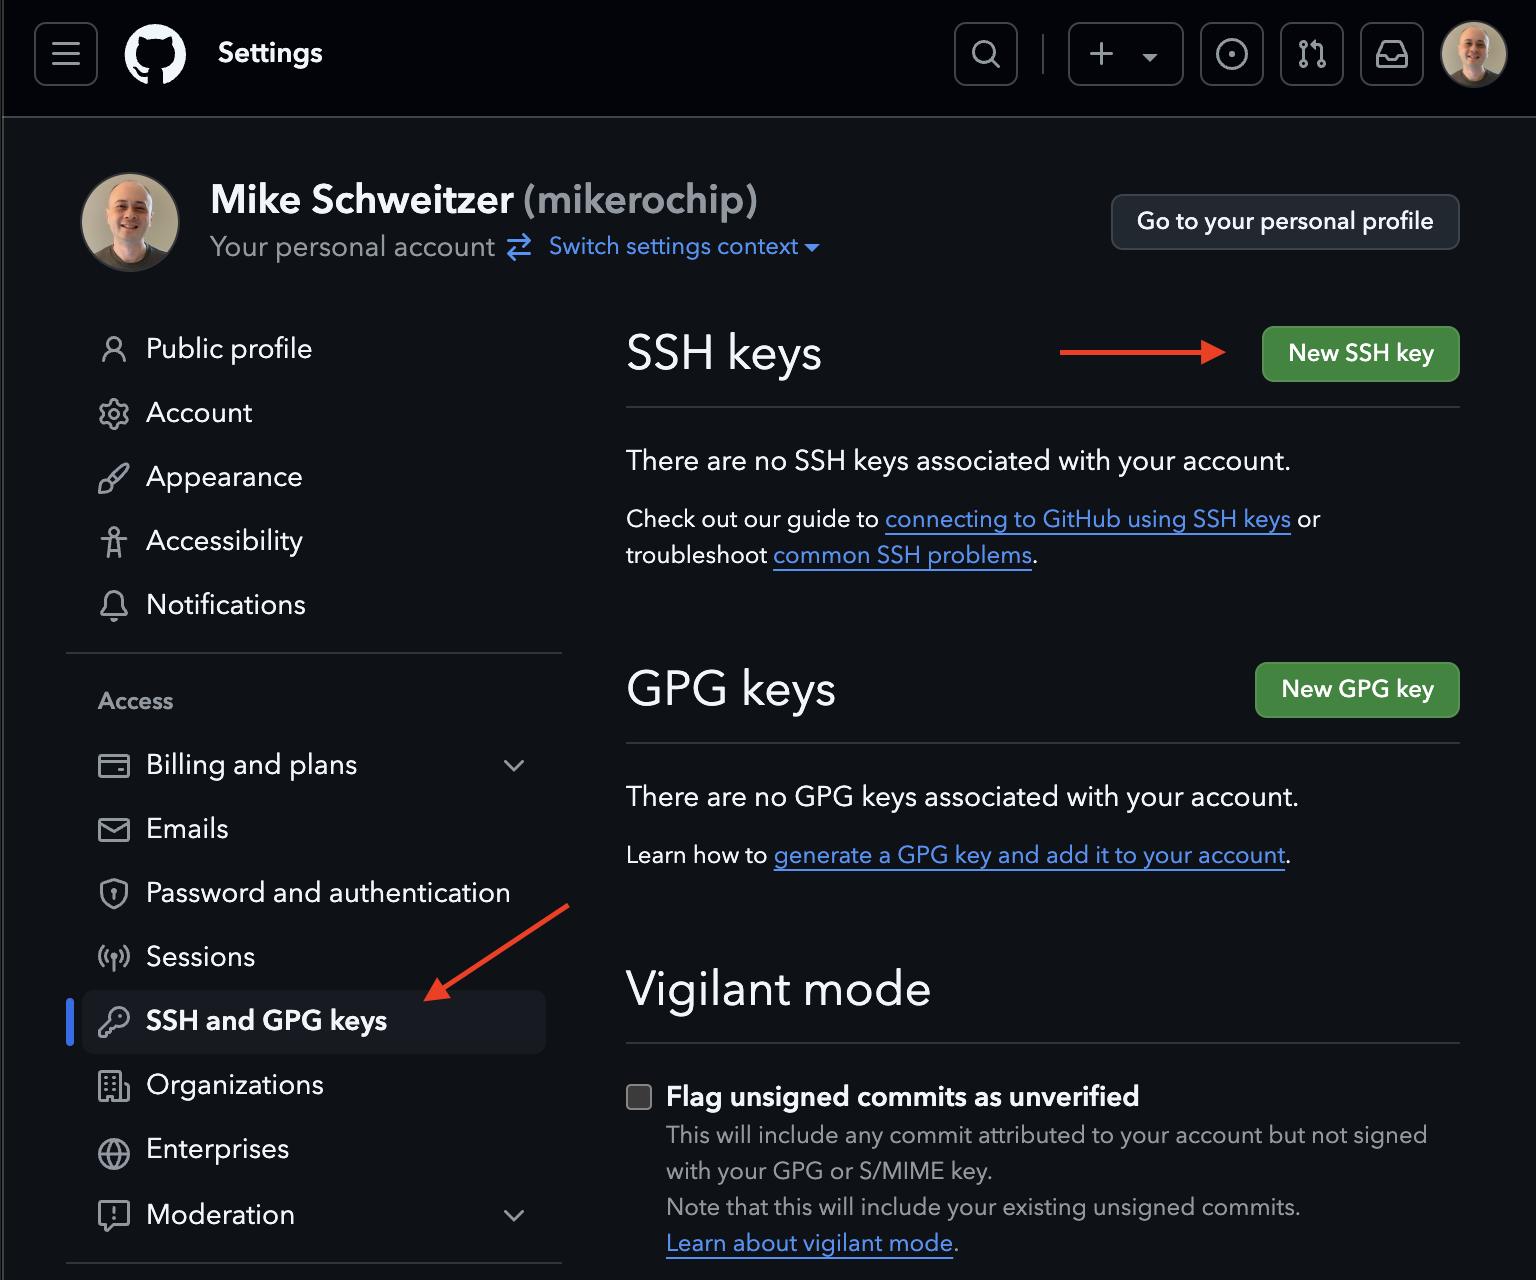
- Title:
<YourMachineName> - Key type:
Authentication Key - You have to copy/paste your public key (located at
~/.ssh/github_foolio.pub) into the Key field.- This is SUPER touchy since you have to paste the contents without any extra whitespace. To do this, open a terminal, then:
- Mac:
pbcopy < ~/.ssh/github_foolio.pub - Windows:
cat ~/.ssh/github_foolio.pub | clip
- Click
Add SSH key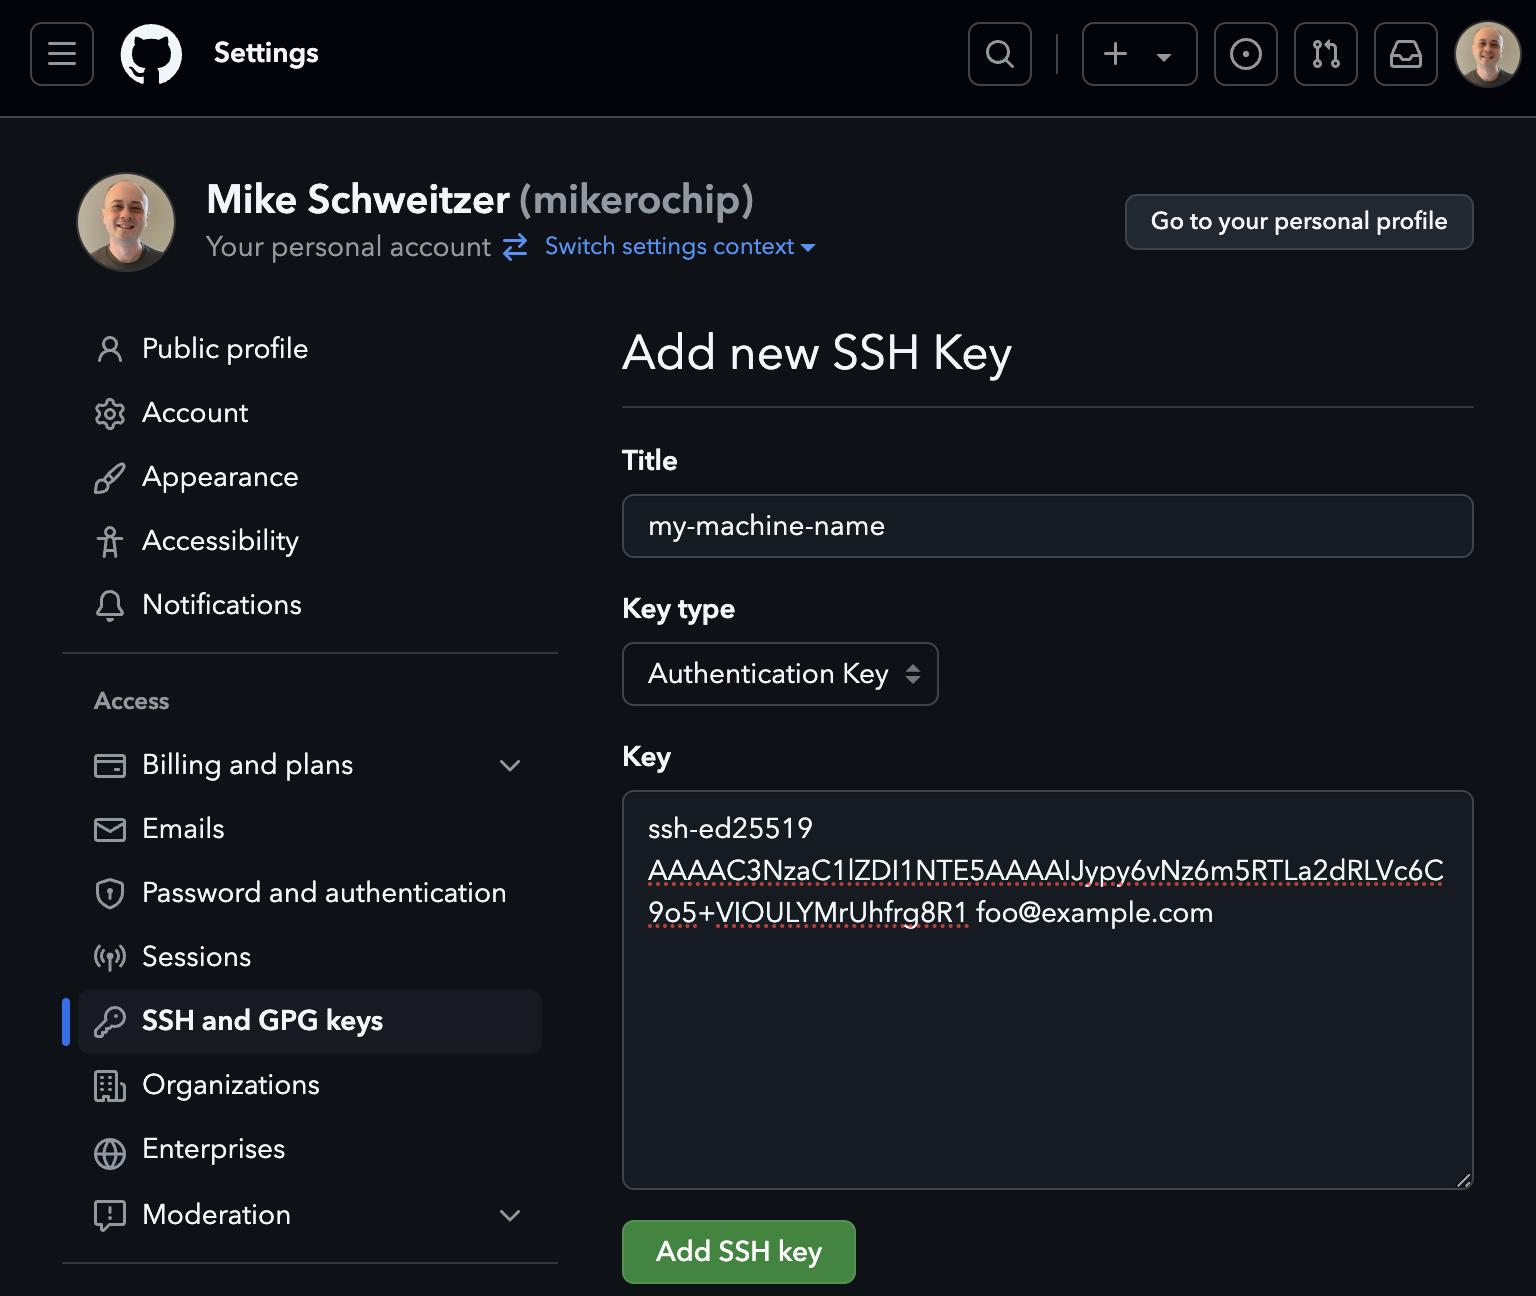
Use a Specific Account for Specific URLs
Let’s assume you want to use your foolio account for any URLs like https://github.com/foolio/ and your foo-bar work account for any urls like https://github.com/bar/
- Open a terminal
- For personal account
fooliogit config --global url."ssh://git@github.com/foolio".insteadOf "https://github.com/foolio"
- For work account
foo-barin orgbargit config --global url."ssh://git@github.com/bar".insteadOf "https://github.com/bar"
Use a Specific Account in an Account Subfolder
Let’s assume you have a folder to hold repos from your foolio account.
~/Developer/github/foolio
And you want to use this as your user identity:
Name: Foo Baloo
Email: foo@example.com
Go to your user folder in Finder/Explorer. Open ~/.gitconfig in a text editor. Add this entry to the bottom:
Mac
[includeIf "gitdir:~/Developer/github/foo/"]
	path = ~/.gitconfig_foolio
Windows
[includeIf "gitdir:C:/Users/<YourUserName>/Developer/github/foo/"]
	path = ~/.gitconfig_foolio
⚠️ A common Windows mistake is to omit the last slash in the gitdir path ⚠️
Still in your user folder, create a new file called .gitconfig_foolio, and make the contents look like this:
[core]
	sshcommand = ssh -i ~/.ssh/github_foolio
[user]
	name = Foo Baloo
	email = foo@example.com
Clone a Repo to an Account Subfolder
The setup is actually done now, so you’ll want to test by cloning a repo.
Let’s assume you have a private repo ugh in your foolio account. Make sure the repo is private so you can test that your ssh credentials are actually being used.
- Open a terminal
cd ~/Developer/github/fooliogit clone https://github.com/foolio/ugh.git- Note that this url will be rewritten under the hood to ssh due to our config
- You should generally always clone with https and let config rewrite to ssh
- If everything was configured correctly AND you’ve never cloned with your foolio account before, you should get an ssh warning:

- Type
yesto proceed with the clone
- Type
- After the clone is done, verify your username and email are correct
- Make a commit
- Do a
git logto verify the username and email - Hard reset back to the parent of the commit
Bonus: Change your “default” (https) account
If you want to change which account uses https when using GitHub, which is generally what most people that DO NOT have multiple accounts use by default, do this:
Mac
- Open the Keychain Access app
- Go to your login items on the left sidebar
- In the topright search bar type
github.com - You should see an entry like this
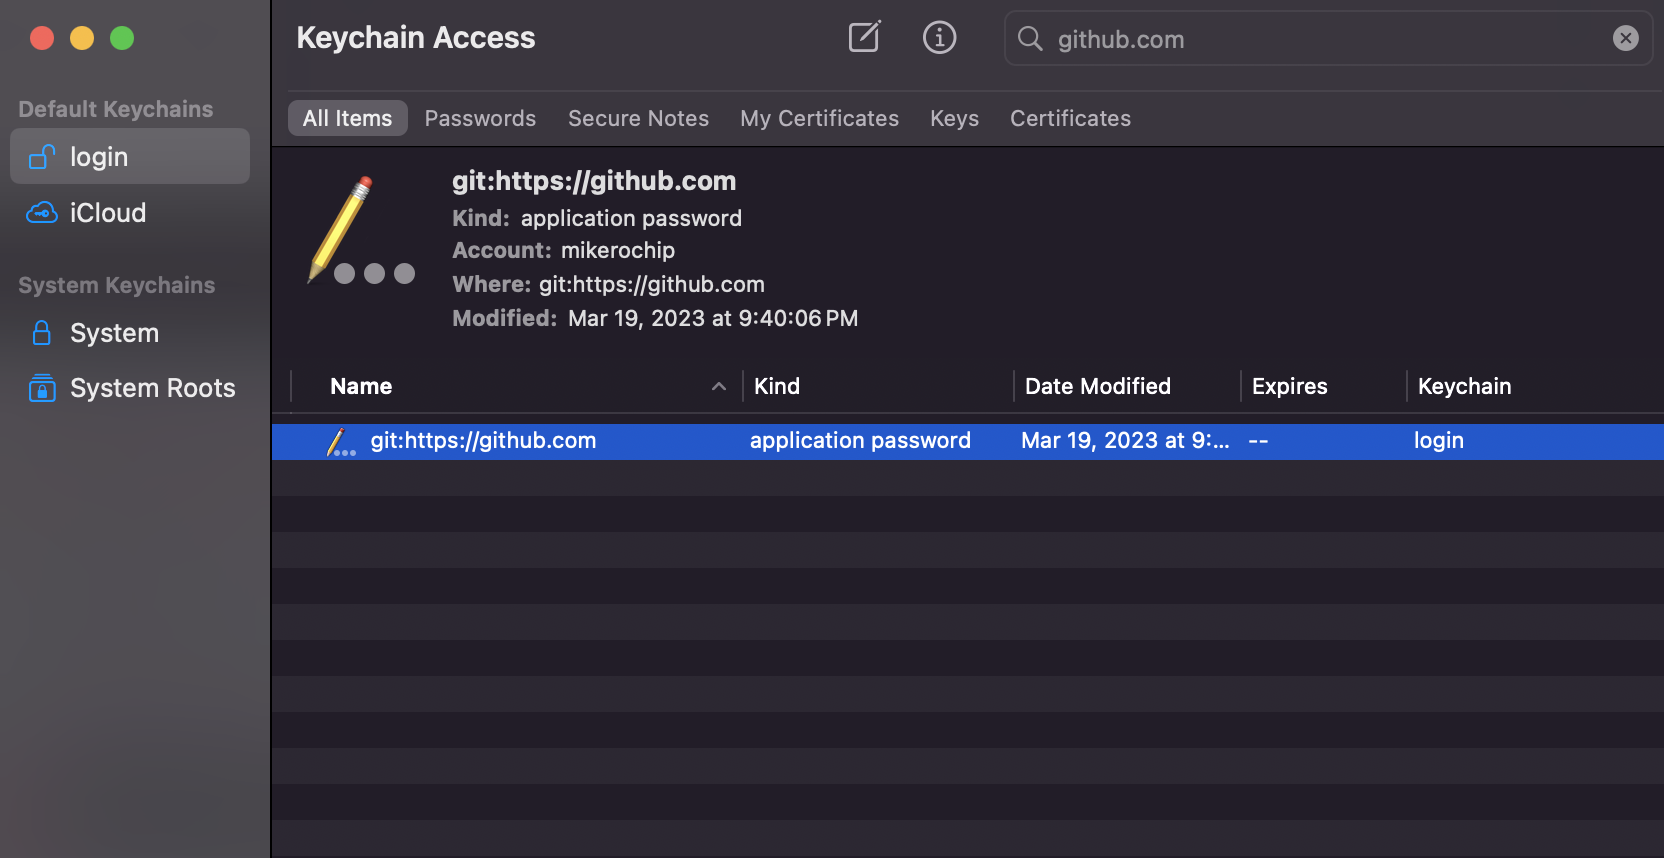
- Right click and choose Delete
Windows
- Open your windows search bar and type Credential Manager
- The Windows Credential Manager should be the top result
- Find the
github.comentry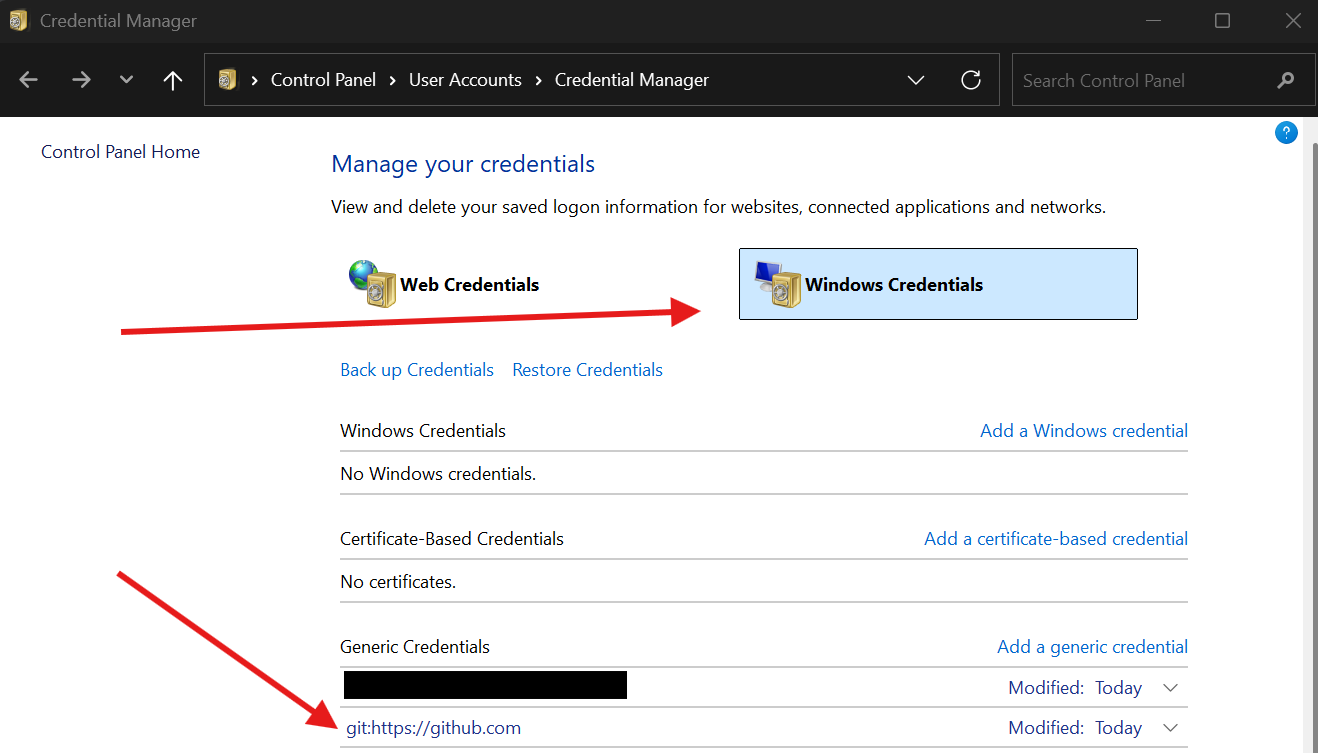
- Delete it